Friday, December 31, 2010

Top Ten Countdown

Since the new year is upon us and soon we will be counting down to 2011, I wanted to do a countdown of my own. I have done so many manicures in the past year+ and sometimes I forget what even I have done! So I thought to refresh my memory and yours, I'd let you know what my favorite manicures are: Each one has a link to the original post in case you want to check back or see how to get the look yourself!

#10: Copycat: Hot Off The Presses! So glad I copied this idea from Orly, it was a lot of fun! This manicure also got a lot of looks and compliments from other people. It's fun to let people know that they could go home and do something very similar and fun on their nails themselves!


#9: Prom 2010 It was clear that shoes were one of my inspiration points during the past year. This manicure was based on a pretty pair of vintage, 80's era shoes. I had a lot of fun sponging the different colors and trying to capture the different sheen and dimension of the shoe fabric. The end result was as good as camouflage.


#8: Christmas Time! This was one of the first Christmas manicures I did. It was a suggestion from a friend that I just ran with. It was so fun to figure out how to decorate my nails as different presents and it was such a fun Christmas manicure.


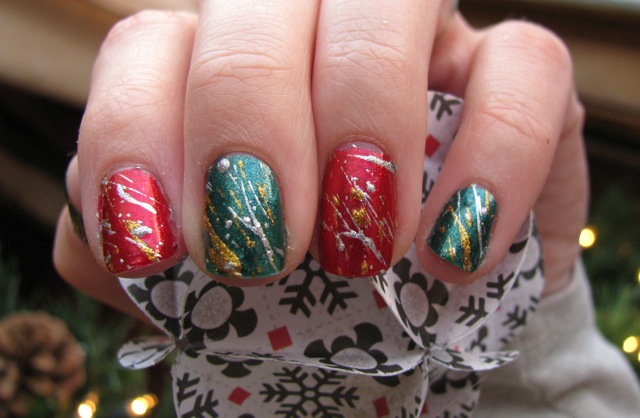
#7:Don't Forget The Fireworks This manicure is so colorful and wonderful, it really does remind me of fireworks.


#6: Stained Glass (for Ryah) This was one of those manicures I had forgotten I had done. After looking through my posts, I fell in love with this manicure all over again. So Beauty and the Beast. I also really like it when friends or followers give me ideas for manicures (and they turn out)


#5: The Eyes Have It This manicure is creepy, Eye know! I think that's why I love it. What I love about it most is the details in the eyes. I really tried to get the multi-tonal, multi-colored look of eyes, and as far as that coming out in the final product, I think it did.


#4: Double The Marble, Double The Pleasure I love marbling and have recently been hooked on adding dimension to marbling by using a single color plus a clear polish. And this manicure turned out perfectly!


#3: When Polish Isn't Enough--Fabric Manicure I was really happy when this manicure came to life and the idea I had in my head came to life on my nails. In fact, I think it was even better in real life!


#2: Groupie Surprise, Surprise! Another marble makes the list. This manicure was so sweet, so yummy and so sparkly. I truly loved it. Plus it reminds me I went to a Ludacris concert and that was amazing!


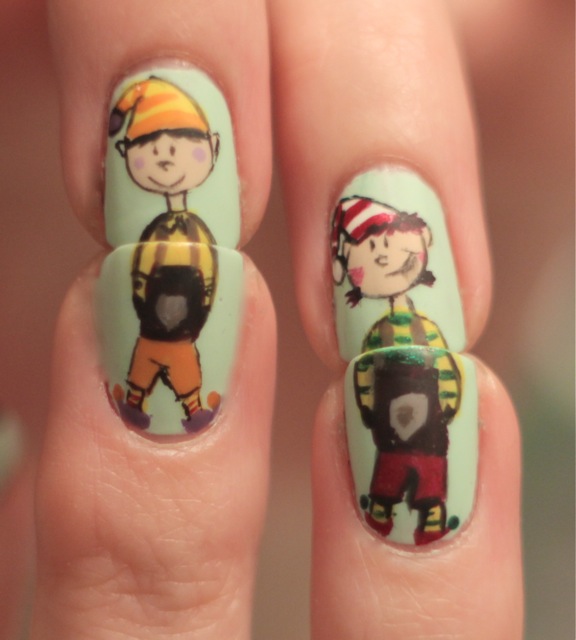
#1: Clutch Powers! and Santa's Little Helpers I'm listing two, but counting them as one based on theme. These, of course, are my favorite manicures. I mean, the what other label could I use but "Totally Awesome"? I'd like to come up with a better name for the two-finger, picture technique I used for these manicures, but I haven't found anything clever enough. By far my most detailed and IMHO creative manicure idea to date--all starting with my nephew's obsession with Legos and me trying to figure out how to make a manicure for him. The end result were two crazy, time-consuming manicures with very fun results!


So that's my list, are some of your favorites missing? I have to say it was hard to pick just 10!!!

The Final Countdown

The end of 2010 is upon us and a new year is beginning! I've had fun detailing my manicures this past year and am ready for a fun night and great new year. My last hope for 2010 is that my manicure bling stays through the night.... I'll see you all in the new year!


Overexposed With Flash:

The Sparkle Shot:

I cut rounded pieces of tape to partition my nails and first paint three coats of OPI Extra-Va-Vaganza on the base of my nail and then filled in the tips by free-handing the with Siberian Nights. I then added the gemstones from So Easy and then applied two coats of Seche Vite to lock the gemstones in place and get a nice shine!

Tuesday, December 28, 2010

Glowing Tips

So my Elves stayed actually for quite a while without chipping. Of course that could be because the last few days all I've been doing is recuperating from the stomach flu and really have been confined to my couch watching TV. With low energy and low motivation, I needed a simple manicure. Done and done.


I painted two coats of China Glaze Harmony. Then used La Splash Nail Art Glitter in Dry Ice on the tips. Sealed with two coats of Seche Vite to smooth out the roughness (but it's still catching on my knitted blanket).

Thursday, December 23, 2010

Santa's Little Helpers

First off, thank you to my friend Jenny for the idea for this manicure. It is now officially in my "Totally Awesome" category and IMHO even better than the first time I thought of this concept. Check the original two finger manicure HERE if you are interested. I am leaving this year's Christmas manicures with a BANG by giving you one of my best manicures, I think, ever! This was a crazy process that took me about 3.5 hours in design/painting time. But don't worry, I was watching a lot of TV and eating dinner and taking random breaks. But totally worth it! Merry Christmas to all of my readers and I hope you have a safe holiday and enjoy yourselves!


Manicure deets: My elves are modeled after the elves found on THIS website.

I'll start with the general and colors used throughout the manicure. The base color is two coats of China Glaze Re-Fresh Mint. Skin for the elves was done by mixing equal parts China Glaze Classic Camel and OPI Skinny Dip'n In Lake Michigan and White (see link for white detail). The brown straps for the elves clothing is China Glaze Ingrid and the brown body/overalls/hair is Evening Seduction. White detail is Ulta Angel Baby and black detail and outlining is Ulta Black Diamond. The "Merry Christmas" was made with Zoya Sarah and the star is filled in with Orly Luxe. The finished look was coated first with Seche Vite (to prevent bleeding with the matte top coat) and then mattified with Essie Matte About You.

Red Elf Colors: Zoya Sarah for hat, shirt and legs. Rosy cheeks in China Glaze Something Sweet.

Orange/Yellow Elf Colors: Yellow is a mix of China Glaze Solar Power and Essie Hello Yellow (no link, sorry), orange in China Glaze Breakin', Purple shoes and balls China Glaze Spontaneous. (this color was also mixed with white to make the light purple rosy cheeks).

Yellow/Green Striped Elf Colors: Red shoes, hat, pants are Zoya Sarah. Yellow is China Glaze Solar Power and green is a mix of China Glaze Paper Chasing and Emerald Sparkle. Rosy cheeks are Zoya Jolene.

Blue Elf Colors: Light blue color is China Glaze Bahamian Escape, Darker blue is China Glaze Shower Together, socks are China Glaze Entourage with stripes in Emerald Sparkle. Rosy Cheeks are China Glaze Peachy Keen.


And For Your Interest, Here's My Christmas Workshop:

Wednesday, December 22, 2010

O, Christmas Tree

Only three more days and then it's Christmas! So excited! Today I'm trimming the tree with nail polish. Well, at least the Christmas trees on my nails. I really like the finished look but found that the polishes with all their subtle and overt glitter made the camera unable to take a crisp picture. Just know that my nails are shimmery and shiny! Also, the pictures don't do the red gemstones on top justice; they are bright red and really reflect in the light. I almost feel like it would shine in the dark....light a light bulb!


I wanted to create dimension with the look I envisioned for my nails as Christmas trees (this photo was inspiration). So, first I coated two coats of China Glaze Liquid Leather for a dark base. I then sponged Orly Meet Me Under The Mistletoe just on my tips and the lighter It's Not Rocket Science from my nail bed to the previous sponged color line. I added an extra sponged layer of It's Not Rocket Science Just along the center of my nail for added color and light reflection. I hand painted the gold stripes first with Orly Luxe and on top of that OPI Gift Of Gold. I added red gemstones for the tree topper and finished the manicure with two coats of Seche Vite.

Sunday, December 19, 2010

Christmas Splatter

I loved my previous "bloody splatter" so much that I wanted to try it with other questions. I do like the outcome of this manicure, but the metallic colors were not that easy to splatter. The gold worked better than the silver. I think it's because they are denser polishes, they needed more force to spatter than my contraption could handle. But I suppose it's like water marbling, not all colors work the way you want them to. Also, doing this manicure is really messy. I used petroleum jelly on my fingers, but the splatter was so wide spread during the process, I got it all over my hands--and the metallic polish was much harder to clean off than I expected. Oh well, all's well in the manicure world!


I used three coats of the alternating colors China Glaze Watermelon Rind and Zoya Lisa. I splattered China Glaze Cheers To You and Orly Glitz & Glamour. I finished the look with one coat of Seche Vite and one coat of Orly Sec 'n Dry due to the thickness of some of the splatter in order to help it dry faster.

Saturday, December 18, 2010

Christmas Swirl

I wanted to do a marble with some of the seasonal colors I have acquired. I very much like how this turned out. I'm not sure if the pictures depict how well the red pops in the manicure. It's pretty


Right Hand:

Left Hand:

I painted two coats of China Glaze Peace On Earth. The colors I chose to marble with were L8R G8R, Zoya Sarah, Sally Hansen Diamond Strength in Flawless. I alternated between color and clear polish during the marble so I could let the under color show through. I topped the manicure with one coat of Seche Vite.

Tuesday, December 14, 2010

Christmas Balls, Part Two

I have the sparkles just dying to be seen and I have to oblige them.  I thought I would try a different rendition of Christmas balls as a way to showcase the glitter.  Which as I have said before, I am obsessed with currently.  Inspiration of late has been hard to come by, but I do like the outcome of this manicure.


I painted three coats of Orly Winter Wonderland.  I then painted these five colors in ball formation on subsequent individual nails: Meet Me Under The MistletoeZoya SarahOrly Glitz & GlamourChina Glaze Harmonyand Entourage.  In the same corresponding order, I added these glitters from LA Splash Cosmetics to the top of those balls: Onyx, Trickery, Golden Egg, Viola, and Immature.  I topped the balls with China Glaze Millennium and lined the balls lightly and finished the topper of the balls with Liquid Leather.  I finished with two coats of Seche Vite.

Sunday, December 12, 2010

Gift Wrapped

I have invested in some great holiday polishes and want to use them as much as I can.  Thus, Christmas manicures are the feature from here until the holidays are over.  I am always open to ideas or challenges if you have any to give.  Today's manicure is very simple mostly because I have no energy after shoveling the crazy amount of snow we received this weekend.  I spent at least 4 hours this weekend shoveling and am so sore right now.  Even with all the work, I still enjoy the snow and chose to enjoy the shoveling, but I'm not asking for any more inches this season, I think 17 inches over the weekend was enough.   


I painted three coats of Orly Meet Me Under The Mistletoe.  The ribbon look is made with the following colors: Orly Glitz & GlamourZoya LisaChina Glaze Cheers To You.  I topped the manicure with one coat of Seche Vite.

Saturday, December 11, 2010

Re-Gifting

This manicure was supposed to be slated for a Jersey Shore themed party I was going to be attending. Due to snow, wind and generally bad weather here in MN, the party was cancelled and now my manicure had been re-gifted as a glorious, snow day manicure. (or at least that's what I'm telling myself and you). So happy snow day! Enjoy the glitter and sparkle of the holiday season!!! Can you tell I've been obsessed with glitter/sparkle lately. Love!!!

Indoor Light:

Natural/Sunlight:

Sparkle Shot!

I first painted one coat for a base of color in China Glaze Shocking Pink. I then put three coats of OPI Extra-Va-Vaganza on the base of my nail. I added two more coats of Shocking Pink to the tips. I added nail art glitter from LA Splash in Golden Egg to the center of my nail (for added dimension) and the tips of the pink. Sealed the sparkles with a coat of clear nail polish and a top coat of Seche Vite.

Christmas Balls

I no longer have this manicure on my fingers but have been busy (and lazy) and thus have not posted. Sorry. This manicure evolved from a straight "polka dot" design to adding the silver lines and making it look more like Christmas balls. So now it is classified as a Christmas manicure!


I painted three coats of China Glaze Sugar Plums. With a dotting tool, I used Cheers To You, OPI Extra-Va-Vaganza!, Glow Up Already!, and Orly Glitz & Glamour. Cheers To You is also what was used for the silver lines. Two coat of Seche Vite were painted on top.

Saturday, December 4, 2010

Christmas Cookies!!!

I'm going to be baking Christmas cookies with some friends in a matter of hours and thought it would be fitting to decorate my nails as tasty treats.  Instead of making cookie shapes, I decided to just make my nails the cookies.  Mmmmm, cookies!

Left Hand:

Right Hand:


I made the cookie color with two coats of China Glaze Classic Camel and one coat of Heaven.  The various "frostings" were with the following colors: Four Leaf Clover, Cheers To You, Heli-Yum, Emerald Sparkle and Ulta Angel Baby.  I used one coat of Seche Vite to finish the manicure.

LinkWithin

Related Posts Plugin for WordPress, Blogger...